Chapter 5 - The Formula Workshop
Crystal Reports comes with a powerful set of tools that let you build sophisticated formulas for creating reports. You can perform tasks such as conditional formatting, specialized calculations, selecting records and report alerts. The next three chapters are a thorough training manual for creating and programming formulas.
 Become a Crystal Reports expert with the authoritative resource available.
The tuturials and tips in this book will take your skills to the next level.
Become a Crystal Reports expert with the authoritative resource available.
The tuturials and tips in this book will take your skills to the next level.Buy at

Writing Formulas with the Formula Workshop
Formulas are referenced in different ways depending upon which part of the report is using them. But they all share the same editor. The Formula Workshop is the command center for entering and editing formulas. Getting a solid understanding of how to use the Formula Workshop is essential before getting into the details of writing formulas. The Formula Workshop is shown in Figure 5-1.
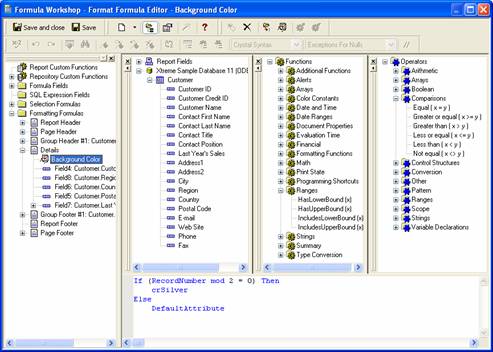
Figure 5-1. The Formula Workshop window.
The Formula Workshop consists of five separate windows. The left window along the side is the Workshop Tree. It shows every formula being used in the report and is categorized by the type of formula. The three windows along the top present the library of fields and functions used for writing formulas. Within these three windows is every available database field, built-in function, and operator. The bottom window is the Definition area where you write and edit formulas. It is like a fancy Notepad editor where you enter text and it highlights different keywords.
Using the Toolbars
Before getting into the details of what each window does and how to use it, let's first explore the toolbars along the top and the buttons on them. Each group of buttons has a different way of assisting you with writing formulas.
Displaying Windows
![]()
These buttons make minor modifications to the windows within the Formula Workshop. The first button toggles the categories and items to be either sorted or unsorted. Sorting the categories makes it easier to find an item in the tree. Clicking the button a second time returns them to their natural order.
The last three buttons hide one of the three other windows. The three windows that they hide are the Report Fields window, Functions window, and the Report Operators window. Clicking the button a second time displays the window again.
There are some other buttons that work with the windows, but they are scattered in different locations around the toolbars.
![]()
This button toggles the display of the Workshop Tree window along the left side. It is located above the other three buttons.
The Show Formatting Formulas button toggles the display of formatted report objects within the Workshop Tree window. This makes it easy to see which report objects have conditional formatting. For example, when you initially open the Formula Workshop window and look in the Workshop Tree window, under the Formatting Formulas node is a list of every report section. Clicking on each section expands that node and shows every report object in that section. The objects that have conditional formatting can be expanded one more level to see those formulas.
Of course, not every report object has conditional formatting formulas associated with it. When you click the Show Formatting button, the report objects that don't have any conditional formatting formulas are hidden. This makes it easy for you to look at the report sections and quickly see how much conditional formatting has been used and look at the details. If this is a report you haven't worked on in a while (or a report that someone else created), then this button helps you quickly understand what is happening behind the scenes.
![]()
The Use Expert/Editor button opens the Formula Expert. When clicking this button, all the windows except the Workshop Tree are removed and the Formula Expert appears in their place. It helps you create formulas based on a custom function. The Formula Expert discussed in more detail in Chapter 6.
Creating New Formulas
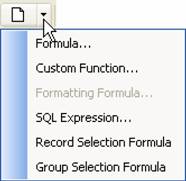
Figure 5-2. Menu items for the New Formula button.
The New button creates a new formula. When you click on it, it shows you a list of the different types of formulas and you click on the type you want to create. If you've been working on an existing formula and haven't saved it yet, you are asked if you want to save it before continuing.
Editing Code
![]()
These five buttons assist you with writing formulas. The first button checks the syntax of the formula. If it finds an error in the formula, it prompts you with a message box telling you if there is a syntax error or not. You can check the syntax after you are finished writing the formula or you can do it after each line. Checking the syntax after each line lets you find a problem and correct it before going forward. This is good when you are just learning how to write formulas and you aren't confident of what you are doing yet. It's also useful if you are writing a complex formula and you want to double check that you didn't make a typo.
The next two buttons are the Undo and Redo buttons. You are probably familiar with these from other programs such as Microsoft Word or Excel. The Undo button removes the last change you made. The Redo button puts that change back if you decide that you shouldn't have clicked the Undo button. It's like an Undo-The-Undo button.Ā J
The last two buttons help you find information. The magnifying glass browses data of a field. This is the same as the Browse Data button we saw with the report experts. It is only available when a field in the Report Fields window is selected.
The last button is the Find button. As you might expect, it finds the specified text within the formula and highlights it. But that is just one part of its functionality. What is a really nice feature is that it not only searches your formula, but it searches the text within any of the windows. Look at Figure 5-3 to see what the Find dialog box looks like.
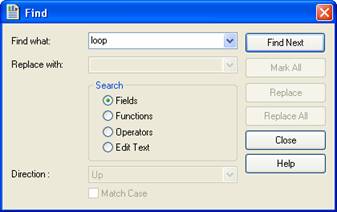
Figure 5-3. The Find dialog box lets you do more than just search within the formula.
Notice in the center of the dialog box that it has radio buttons that specify where to search for the text. It finds text in Fields, Functions, Operators, and Edit Text (the Definition area). If you've ever tried to find a function name in the Functions tree, it can be confusing to figure out which node the function is listed under. The Find dialog box finds it for you. And if you only know part of the name then it does partial text finds as well.
The Find feature also replaces existing text with new
text. But this is only enabled for the Edit Text option (you aren't about to
start renaming
To read all my books online, click here for the Crystal Reports ebooks.